Wednesday 25 September 2019

Joining GoPro video files together automatically

GoPros split up large video files into chapters, joining them back together into a single, large file is a bit fiddly.  Here's how to do it automatically using the Automator application I created (StitchGoProSession.app)

tl;dr;

Install ffmpeg using Homebrew and then drop the folder containing your GoPro chapters onto the Automator application StitchGoProSession.app

The details:

There are a few moving parts, the most important is to have ffmpeg installed.  I did this using Homebrew and the bash script in the Automator application depends on that path.  It's easy enough to change in the script, which is listed below.

Essentially the StitchGoProSession automator application is a wrapper round the bash script, but the first step is 'GetFolderContents', which produces a list of the files in the folder, which are then passed through to the script.

Tuesday 11 June 2019

Using Automator to hack together tests of MessageBird's IVM flows

I'm in the fortunate position of being able to do some freelance work for my former employer (DrDoctor), helping them transition their Interactive Voice Message/Interactive Voice Response functionality from a well known SaaS telecomm's behemoth to their main telecomm's provider MessageBird.  Specifically moving to using their Flow Builder.

Part of that involved extensive acceptance testing of the flows we would be using for patient interactions.  This started as as very manual process, with me POSTing to the MessageBird API, receiving a call and recording it with a microphone.  This was both slow and error-prone as there were quite a few occasions when I failed to hit the record button in time (as the application didn't have focus), or I had the gain set on the mic incorrectly, or because I was thinking about the other two issues I selected the wrong option in the IVR menu.  Bad times.

However, I'm a nerd and once I start doing repetitive work I think to myself: a machine should do this while I read about AI/Blockchains/Quantum Computing etc.  With that in mind I realised that I could do almost all of this work 'in the box' (as my music producing friends say) using Automator to join up all the moving parts.

It ended up a bit Heath Robinson/Rube Goldberg, but it worked.  Automator does this:
  1. Display a list of test scenarios
  2. Remember which one is selected
  3. Generate a GUID 
  4. POST to MessageBird via curl in the Terminal
  5. Launch QuickTime 
  6. Run an AppleScript that waits until FaceTime isn't running and then saves the audio file from step 5 using the values from steps 2 and 3 to name it
I used Loopback (from Rogue Amoeba) to route the audio out of FaceTime to the input of the QuickTime audio recording.

The magic happens because when my iPhone rings, I'm able to take the call on my computer. So basically I run the Automator workflow (using the keyboard combo 'cmd + r', obvs) and wait for the call to come from MessageBird.  When FaceTime rings I accept the call on my Mac, and respond to the IVR menu on my Mac as well.  When I end the call the audio file is saved automatically (with a meaningful name, from the list of scenarios) and I can send it off to my Product Owner for review (and they in turn can send it to the client if they wish).

They say a picture speaks a 1000 words, so hopefully this video will show what all the words above mean in practice ...


Sunday 12 February 2017

PowerShell to connect to a VPN more efficiently

TL;DR;

On starting PowerShell autoload a function that will prompt for a password which it then uses in a call to rasdial to open a previously configured VPN connection.  Why?  To stop using the mouse.

Details

If you have to frequently connect to a VPN from Windows 10, using the GUI starts to feel quite long-winded.  Particularly if (like me) you cannot save your password as part of the VPN profile (in my case the password is a token that has to be requested for every new connection, but you might equally have it mandated that the password is not to be stored locally). Fortunately with just a few lines of code, PowerShell offers a faster, mouse-free alternative.

The first thing to do is create the VPN profile (see the instructions from MS on how to do this).
Now create a script file that contains a function that will do the actual connecting to the VPN, e.g.
Function vpnMyProfile
{
$password = Read-Host -Prompt 'Enter password'
rasdial "[your VPN profile name]" [your vpn user name] $password
}

Save it in a sensible location (you'll use the path in a moment).

Finally, add a line into your PowerShell profile to the file.  I have a few scripts that I want to load when PowerShell starts so it's slightly more convoluted, but the principle is get PowerShell to
$psdir = "C:\Users\[YourUser]\Documents\WindowsPowerShell\AutoLoad" #The path from the step above
Get-ChildItem "${psdir}\*.ps1" | %{.$_} #loop through all the .ps1 files in the dir and load them

Now you should be able to simply type 'vpnMyProfile' at the PowerShell prompt and you will be prompted for your password.  Enter it and hit 'return' and hopefully you should connect to your VPN.

Added bonus: Disconnect from your VPN without using the GUI.
In the same file that contains your function to connect to your VPN, add the following:
Function vpnKill { rasdial /Disconnect}

Which is slightly quicker than typing out the command it effectively aliases (with the flag).

Using Castle Windsor to implement a Circuit breaker

TL;DR;

So that we don't send out vast numbers of SMSes or emails unintentionally, we have taken the 'Circuit Breaker' design pattern described in 'Release It!' (Michael Nygard) and implemented it using Castle Windsor's Interceptor functionality.

Details

Michael Nygard explains that a software circuit breaker works by "wrapping dangerous operations with a component that can circumvent calls when the system is not healthy", which is an excellent fit for Castle's Interceptor as it proxies method calls and the implementation (of the interceptor) can decide whether or not to invoke the original operation, based on whatever logic makes sense (in our case number of emails or SMSes sent that day, compared against historical data).

Even better, because the component that sends emails and SMSes subscribes to a message queue, "once the danger has passed, the circuit breaker can be reset to restore full function to the system." and we can simply replay any failed messages on the bus that should have been processed.

Implementation

It is very important to us that we do not send lots of SMSes or emails accidentally, perhaps because of a bug in our software or incorrect application configuration.  A circuit breaker is conceptually a good fit for that requirement: it should stop the system from going haywire when it tries to do too much of something (in same way that a real circuit breaker prevents your house from burning down because you've plugged in five electric fires in your living room).

As part of our distributed, bus-based system we have a single component that deals with sending SMSes and emails and that's all it knows how to do (there is no domain knowledge in there, it simply receives requests to send messages and makes the relevant API request to various 3rd party providers).  It listens out for various (very similar) requests for messages (generated by other components in the system) and calls our providers' apis, which again makes it a very good fit for a circuit breaker as there is, effectively, only one place to insert it.

Using a very light wrapper around EasyNetQ we have a number of 'Processors' whose job is to pick messages up from a queue and process them.  Since they all implement the same interface, it is very easy to write an interceptor for requests for various types of email that looks like this:

public class EmailVolumeInterceptor : IInterceptor
{
        private readonly EmailVolumeBreaker circuitBreaker;

        public EmailVolumeInterceptor(EmailVolumeBreaker circuitBreaker)
        {
            this.circuitBreaker = circuitBreaker;
        }

        public void Intercept(IInvocation invocation)
        {
           if(circuitBreaker.ProcessMessageTripsBreaker()
           {
                 throw new CircuitBreakerException("Limit hit for emails to be sent today");
           }

           invocation.Proceed();
        }
}

We wire these up directly in an installer class for Windsor:
Component.For<IDrDrEventProcessor<SendEmail>>().ImplementedBy<EmailSender>().Interceptors<EmailVolumeInterceptor>(),

In our case (for emails) we don't need to know anything about the request, we just need to increment a count of emails that have been sent.  Our circuit breaker has some logic around working out what its limit is and then checking whether this request would exceed that, not to mention alerting us if there's a problem.  It also has some logic around what to do when 2/3 of capacity have been reached, which extends the metaphor somewhat, but we believe could be useful.

When the breaker trips all requests to send an SMS or email (depending on which breaker has tripped) cause an exception (the method always returns true), which means that all the requests are put onto our error queue so we can replay them once we have resolved the issue.

Resetting the breaker requires manual intervention, forcing someone to resolve the issue that caused the problem in the first place.

This is our first implementation of a circuit breaker and it's definitely been a learning experience. Technically it's been reasonably straight forward, but the difficulties have arisen from business questions:
 - what is a reasonable test for the breaker to perform? i.e. what is the metric you choose in order to decide whether your call to send an SMS should be ignored or not?
 - are we prepared to deal with having to fix things after it trips (akin to having to reset your microwave clock after a real circuit breaker trips)?
 - wait, what happens if we send a load of junk but the volume of it doesn't trip the breaker? (a circuit breaker won't stop you getting an electric shock from something that's wired incorrectly ... although it might trip if you create a short to Earth ... but I digress).
 - are you sure it's working?  Should we test it in production?

Wednesday 8 July 2015

Commandline VLC with global hotkeys (using QuickSilver and Karabiner)

TL;DR;

Create a trigger in QuickSilver that pipes the word 'pause' to the rcold interface of VLC.

Details

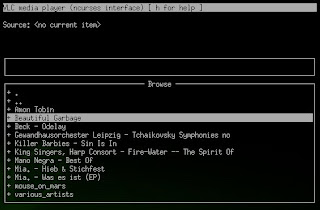
Imagine having a Mac and not wanting to use iTunes.  Imagine hating iTunes so much that you'd rather use an interface that looks like this:
Unlikely, I realise, but that's where I'm at.  I really don't need or want a complicated media center [sic] application that puts the kettle on while it tries to download album art, so I use the VLC NCurses interface.  It's far from perfect, but I really, really hate iTunes, so this it's an OK option.

However, what I do miss is having a single key to pause music play back, whether the player has focus or not i.e. what I used to have with the F8/play-pause in iTunes. It turns out there are ways to achieve this.

First up, this is how I launch VLC

Which basically says, launch VLC using the NCurses interface, starting in the following browse directory, also use an extra interface, Old Remote Control and while you're at it create a socket to communicate with it called /tmp/vlc.sock. Which means that I now have two interfaces controlling VLC: NCurses, which I use to browse for music from my music library, and oldrc, which I use to be able to stop and start playback using a global hotkey.

As I mainly use my laptop keyboard I'm missing a few function keys that would be really handy here.  Enter Karabiner which allows me to map Fn + SPACE to F13, with something like this in the private.xml

The final step is to create a hotkey using QuickSilver which is done in the Triggers section of the QuickSilver Configuration. Click the '+' symbol and select 'HotKey'.  Paste the following
into the 'Select an item' field and set the action to 'Run Command in Shell'.

Job done, every time I hit 'Fn + SPACE' I send the command 'pause' to that socket.  On the other end of that socket the VLC rc interface understands that and toggles pause/play. Unfortunately there is a minor irritation in that the rc interface produces output like this:
status change: ( play state: 3 )
pause: returned 0 (no error)
status change: ( pause state: 3 ): Pause

that is then dumped out onto the NCurses console space (which looks terrible).  A simple solution is to hit 'Ctrl + l' to clear the UI.  Ideally I'd stop this happening at all, but I haven't figured out how.  Yet.

Monday 6 July 2015

Parallels, Ubuntu, Emacs - weird Meta key behaviour

I'd been tearing my hair out over an issue I was having with Emacs (24.3.1) on an Ubuntu (14.04) VM running under Parallels (10.1.2) where I had to hold down the Meta key and hit the character key twice in order to make it work i.e. in order to get Emacs to respond to M-x I had to type M-x-x, or for M-w I had to type M-w-w.  Whilst this wasn't the end of the world, it was annoying as I want a consistent experience across environments when using Emacs.

I'm not sure where the problem stemmed from, but I do use Karabiner to remap my OSX modifier keys, so that I have Command, Control,  Option, Space, Option, Control, as that way I have two sets of Control and Meta keys, one under each hand.  Anyway, after spending too long trying to do more and more convoluted remapping in Karabiner to work around the problem (and failing) I discovered a far simpler solution in Parallels itself.

Opening up the configuration for the VM (Actions > Configure ...) then selecting the 'Hardware' tab, then 'Mouse & Keyboard' and clicking 'Shortcuts' presents you with a list of keyboard mappings (e.g. Command+x -> Ctrl+x).  Clicking the '+' symbol allows you to add further mappings and if you select 'Alt' in the 'From' row and 'Alt' in the 'To' row this maps 'Option' to 'Alt' and voila the Meta key works as expected in Emacs in the Ubuntu VM.

Sunday 22 March 2015

Overriding dependencies with Castle Windsor in SpecFlow tests

At DrDoctor we have a reasonable set of Spec tests using SpecFlow.  These tests tend to be a lot more involved than our unit tests as they always exercise most (close to all) of an application - and sometimes even multiple applications that make up portions of the entire system.  We don't have hard and fast rules about how much of the system a set of specs should cover, but they tend to end up as fairly significant integration tests, almost always hitting the database for example.

As these specs tend to be written prior to the implementation* we often start with dependencies mocked out and as we implement the system under test move to real objects.  For instance, we might start with a mock IGetThatObjectYouNeed data access class that ends up being implemented as part of the functionality we are building.

However, once the functionality is built, we finish in a situation where the component we have been working on has its dependencies composed using an IoC container (Castle Windsor) and the specs build up the required dependency graph manually.  While that's not catastrophic, we really like our specs because they show up problems with an application in a way that unit tests don't, so knowing that the application is composed in the same way in the specs and in the real world also helps us sleep easy.  It's kind of like the difference between knowing that all the parts of a car work and knowing that all the parts work and they've been put together the right way.

A fairly simple way to do this is to use Castle's fluent registration to call your application's installer e.g.
var container = new WindsorContainer().Install(new YourApplication.Installers.YourInstaller());
var sut = container.Resolve<ApplicationEntryPoint>();

A problem with this though is that it may use every concrete implementation that your application requires, which might not be what you want for tests that are run many times a day.  For instance if your application sends SMSes via a 3rd party service, you probably don't want your automated tests using that.

In order to avoid this, you can have multiple installers in Windsor and then only call the installers you need.  We have a separate BusInstaller for exactly this reason, so that we can use a different implementation in our tests.  Having said that you probably want your installers separated out into areas that make sense for your application, not that make sense for your specs.  Also, you probably don't want to have to change your installers because of modifications to your specs.

In order to avoid using specific implementations that are registered in an installer that you don't want to modify, you can use another feature of Castle Windsor that allows you to register multiple implementations of a type and declare one as default (http://docs.castleproject.org/Windsor.Registering-components-one-by-one.ashx)

Thus you might have an installer that looks something like this:
public class MyComponentInstaller : IWindsorInstaller
{
    public void Install(IWindsorContainer container, IConfigurationStore store)
    {
        container.Register(
            Component.For<IDoSomethingYouCareAbout>().ImplementedBy<SpecificImplementation>(),
            Component.For<IStuffRepository>().ImplementedBy<StuffRepository>(),
            Component.For<IHitAnExternalResource>().ImplementedBy<ServiceYouDoNotWantToHit>(), // don't want this to be used in the specs
            Component.For<IAmAlsoUsefulToTest>().ImplementedBy<AnotherSpecificImplementation>(),
            Component.For<IAmAnotherRepository>().ImplementedBy<AnotherRepository>(),
            Component.For<ApplicationEntryPoint>());
    }
}

Then in your spec wherever you set up your system under test:

var container = new WindsorContainer().Install(new MyApplication.MyComponentInstaller());
container.Register(Component.For<IHitAnExternalResource>().UsingFactoryMethod(Mock.Of<IHitAnExternalResource>).IsDefault());
systemUnderTest = container.Resolve<ApplicationEntryPoint>();

The second line, using 'IsDefault()', means that rather than having to remove the 'ServiceYouDoNotWantToHit' from the container, we override it with our mock (we're using MOQ, if you're wondering about the syntax), by setting it as the default implementation that Castle returns.

In this way you can avoid whichever concrete implementations you want, but still have quite a high level of confidence that your actual application is composed correctly.


*we're not purist BDDers, but it's a style that works well for us a lot of the time.